EclipseArmebs4/FirstSteps
(→Before the first project) |
Marc.pignat (Talk | contribs) (→The leds project) |
||
| (3 intermediate revisions by 2 users not shown) | |||
| Line 1: | Line 1: | ||
{{public}} | {{public}} | ||
{{TOC right}} | {{TOC right}} | ||
| − | If you're here, you should have already followed the | + | If you're here, you should have already followed the [[Tools/EclipseArmebs4/Setup|setup]] |
Please have a look at the [[Hardware/ARMEBS/4/Troubleshooting|troubleshooting]] page before asking for help. | Please have a look at the [[Hardware/ARMEBS/4/Troubleshooting|troubleshooting]] page before asking for help. | ||
| Line 21: | Line 21: | ||
*** Finish [[File:importlib_5.png|200px]] | *** Finish [[File:importlib_5.png|200px]] | ||
| − | == The <code> | + | == The <code>_MODEL</code> project == |
| − | * Import the <code> | + | * Import the <code>_MODEL</code> project |
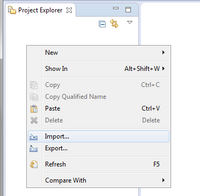
** Right-click in the "Project explorer" -> import... > Project from SVN > | ** Right-click in the "Project explorer" -> import... > Project from SVN > | ||
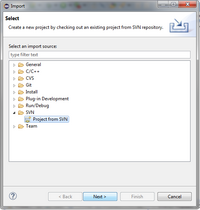
| − | ** Use existing repository (armebs4) > Next | + | ** Use existing repository (armebs4) > Next [[File:importleds_1.png|200px]] |
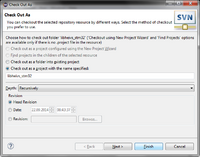
| − | *** Browse... > select armebs4/trunk/demos/leds > OK | + | *** Browse... > select armebs4/trunk/demos/leds > OK [[File:importleds_2.png|200px]] |
| − | *** Finish > Finish | + | *** Finish > Finish [[File:importleds_3.png|200px]] |
* Build the code (ctrl-B) | * Build the code (ctrl-B) | ||
* Run it | * Run it | ||
| − | ** Run > Debug configuration ... select "GDB OpenOCD Debugging"/ | + | ** Run > Debug configuration ... select "GDB OpenOCD Debugging"/_MODEL > Debug |
** The program will be programmed in flash, this can take some time | ** The program will be programmed in flash, this can take some time | ||
** If eclipse ask for switching to the debug perspective > OK | ** If eclipse ask for switching to the debug perspective > OK | ||
| Line 68: | Line 68: | ||
Import the <code>stdio</code> project, run it and watch for the console (the <code>stdio</code> project is near the <code>leds</code> project, you can use the same procedure as described in the <code>leds</code> project. | Import the <code>stdio</code> project, run it and watch for the console (the <code>stdio</code> project is near the <code>leds</code> project, you can use the same procedure as described in the <code>leds</code> project. | ||
| + | |||
| + | == Going further == | ||
| + | |||
| + | The [[Hardware/ARMEBS/4/Team |ARMEBS4 team]] has done some samples projects : [[EclipseArmebs4/DemoProjects | demos]] | ||
Latest revision as of 08:49, 4 December 2014
|
If you're here, you should have already followed the setup Please have a look at the troubleshooting page before asking for help.
Before the first project
Eclipse is somewhat complicated to configure, so there is a preconfigured workspace in your setup,
probably in C:\Programs\ARMEBS4\___VERSION___\tools\default_workspace_to_be_copied.
- Copy the default_workspace_to_be_copied to a convenient place, for instance your desktop.
- Run Eclipse (Programs/Eclipse for ARMEBS4)
- Import the
libheivs_stm32library- Right-click in the "Project explorer" -> import... > Project from SVN >
- URL : https://repos.hevs.ch/svn/armebs4
- Use a custom label : armebs4
- user : hevslabs
- password : hevslabs
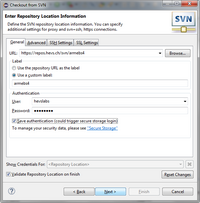
- > Next
- Browse... > select armebs4/trunk/libheivs_stm32 > OK

- Finish
- Finish
- Browse... > select armebs4/trunk/libheivs_stm32 > OK
- Right-click in the "Project explorer" -> import... > Project from SVN >


The _MODEL project
- Import the
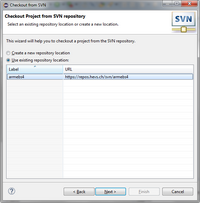
_MODELproject- Right-click in the "Project explorer" -> import... > Project from SVN >
- Use existing repository (armebs4) > Next
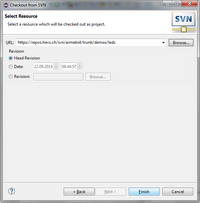
- Browse... > select armebs4/trunk/demos/leds > OK
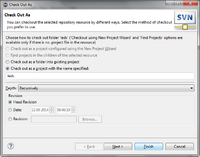
- Finish > Finish
- Browse... > select armebs4/trunk/demos/leds > OK
- Build the code (ctrl-B)
- Run it
- Run > Debug configuration ... select "GDB OpenOCD Debugging"/_MODEL > Debug
- The program will be programmed in flash, this can take some time
- If eclipse ask for switching to the debug perspective > OK
- The program is now stopped at the beginning of main, start it with "run > resume" or the corresponding button.
- The 4 red leds should blink
- Add a breakpoint by double-clicking in the left (blue) margin, at the "counter++" line.
- The program is stopped.


Debugger buttons

Optimisation and debugging
The variable window will show you some unexpected result :

This is caused by the optimization. To disable optimization, go to the project manager (perhaps in the c/c++ view), right-click on the project > properties > c/c++ build > settings > optimisation and set optimization to 0.

Re-debug the software, now the variables should be shown :

The stdio project
Now that you're familiarized with the Eclipse IDE, let's have a look at the stdio project.
The stdio are routed through the USB, here is a view of the device manager, with the "Device by connection" view :

The port on which the stdio are redirected is the first serial port of the ARMEBS4 board. On the image shown this is the ARMEBS4 stdio is connected to COM4.
This port number will be used in Eclipse when connecting the console. To show the console in eclipse, window > show view > others > Terminal/terminal. It should be configured for using the right COM port (in my case COM4), with 115200 bauds, 8 data bits, 1 Stop bit, no parity bit and no flow control.
Import the stdio project, run it and watch for the console (the stdio project is near the leds project, you can use the same procedure as described in the leds project.
Going further
The ARMEBS4 team has done some samples projects : demos