Chrono
|
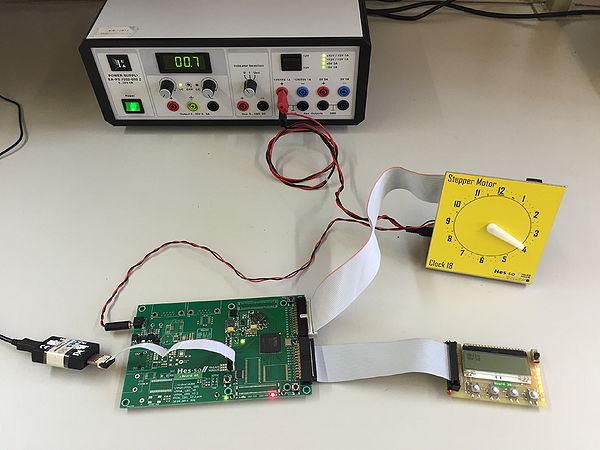
The Chrono project is an ElN project done at the end of the first semester. It consists in controlling a stepper motor which moves a hand in a clockwise direction. This emulates a stop watch.
Specification
Minimal system
The basic specification is the following one:
- When the restart button is pressed, the hand turns back to the starting position (12 o'clock), which is signaled by a Reed relay.
- When the start button is pressed, the hand will move by 1/60th of a full turn every second.
- When the stop button is pressed, the hand stops and waits at the current location.
The minimal system doesn't handle the cases when the user acts erratically, such as pushing the restart button when the hand is already at 12 o'clock position.
Options
The students are given the opportunity to design a more complex system. Two buttons, 10 LEDs and optionally a 4-line LCD display allow to debug or to add functionalities.
Optional functionalities already seen are:
- PWM: when the hand is stopped, the current in the corresponding coil can be reduced using a repetitive pattern
- counting minutes: whilst the hand shows the seconds, the minutes can be displayed on the LEDs
- smart restart: the direction for moving the hand back to the 12 o'clock position can be chosen in function of its actual position
- lap time: when the hand is stopped, a counter still counts the seconds and a further button press drives the hand as fast as possible to the current time.
- LCD display: the LCD can be used to display information such as the minutes. An LCD IP Core for the display communication is provided.
The LCD comes with a control block to which one can send an ASCII character to. Control characters allow to navigate on the LCD display.
Components
The system consists of
- a chronometer assembly with a stepper motor, a single hand and a Reed relay to signal position 12 o'clock
- an FPGA prototyping board
- a user interface board with 4 buttons and 8 LEDs and an optional LCD
Design
Toplevel Block
- The empty toplevel block shows the circuit's inputs and outputs.
Getting started
In order to start the projects you should do the following:
- Read carefully the specifications above
- Consult the guides for the first steps
The EDA tools cheatsheet can be a great help for the circuit design and synthesis.
Additional Information
- Survival guide
- Board combinations
- Additional informations for teachers.
